I had about 3 weeks worth of pictures in my camera. You’d think that was a lot of pictures but the roll of film only has 12 negatives on it. I had been careful not to “waste” any pictures with impromptu shots, so from the first to the last shot was about 17 days. During that time, I could only hope that something worthwhile was captured. I had to wait until I developed the roll to find out.
On Wednesday morning, the day before Thanksgiving I set out my supplies, checked my chemicals and removed the film from the camera. Then, after a good cup of coffee, I was ready to start.
I needed an open workspace, so I used the base of my enlarger in the darkroom. I dusted the enlarger itself and wiped off the base. I didn’t want any dust particles landing on my film. I set out the developing tank, its lid and the spool where I could easily grab them in the dark. I set the spool on its side with its opening at the top. I set the reel in a U-bolt which I have been using to help keep it from rolling. I also had a pair of scissors sitting near-by.
After I turned out the light, I felt around to make sure I knew where each piece was. I looked to make sure there weren’t any new light leaks since I did my last roll. Satisfied that I knew where everything was and that I was in total darkness, I slit the paper band on the roll and started unwinding the film.
The film I was working with was black and white, 120 Kodak T-Max 100. This size of film is a lot more flexible than 35mm film and it can be tricky lining it up the opening of the reel. It had been almost two months since I had done a roll this size and I was glad that I had practiced beforehand. After a couple attempts, the film went in as planned. I only hoped that I hadn’t put any creases or marks on the negatives.
There is always a fear that I’ll drop the film or part of the tank during the loading process. I don’t want to be feeling around on the dirty floor in the dark looking for the lid or even worse, the strip of film! I put the reel into the tank making sure the lid was on properly and then turned on the light.
I cleaned up and re-covered the enlarger before I did anything else. If I didn’t do it now, I figure that I’d probably forget about doing it and everything would be even dustier the next time I used it. This is something I learned from my machinist days.
The chemicals were put in a water bath to bring them to the proper temperature, 68° Fahrenheit. I had previously looked at the Massive Dev Chart online. (Massive Dev Chart Film Development, Film Developing Database) This is a great site to determine what the times for various films and developers should be.
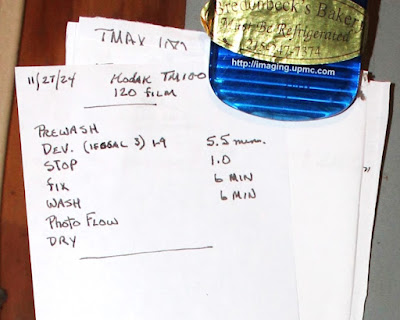
I wrote the times for all the steps on a piece of paper and hung it up near the timer. After a couple more sips of coffee I was ready to go. I set my timer and started the first step, a prewash.
After finishing the developer, stop bath and fixer steps, I was able open the tank and see if everything had gone as planned. Even though I have done this numerous times, I am still apprehensive about what I’ll find when I open the tank. I removed the lid and slid the reel out and was happy to see images on the film! Now, I only had to worry about whether any of them were any good! It really isn’t as worrisome as this but I have had rolls go through that I inadvertently exposed to light, and I’ve developed a few rolls in which the camera wasn’t working properly. It is always a good feeling to see that everything came out OK.
Finally the washing process was finished along with dipping the reel into some Photo-Flo, I was now able to unwind the filmstrip from the reel and see what I had taken. After 2 weeks, I tend to forget exactly what pictures were on the film and it is always a nice surprise to re-live these bits of the past once again. Looking at the strip as it hung to dry, everything looked OK. I didn’t see any bends or creases made by my attempts at loading the film onto the reel. The negatives all looked properly exposed and looking quickly, everything seemed to be in focus. I closed the door and let the film dry.
So far, so good! It was now time to do some Thanksgiving preparations.
An hour later, the film was dry. I took an archival filmstrip holder and labeled it. Then I cut the negatives into strips of three and slid them into the holder. Using a light box with my digital camera positioned overhead, I took a picture of the proof sheet and then a picture of each of the negatives. Using Adobe Photoshop I cropped the negatives, straightened them and then made a copy, inverting the negative into a positive. I saved the negatives and the positives in a file on the computer with the days date and a brief description of what they are. The “actual” negatives were placed in a 3-ring binder with other negatives from the current year.
With the pictures on the computer, I will be able to look them over and decide which ones can be used to make prints. This will probably be done some time later in the winter, on those days when I don’t want to go outside into the cold.
I cleaned up the tools I used and put the chemicals away. The area is now ready for my next chore…doing my laundry. Once again, I came out with another good batch of negatives. Practice makes perfect, or at least close to perfect.
You should give film developing a try; take a step back in time and experience the fun of doing things the old-fashioned way. It is a great hobby. I find that it is a great sense of achievement when I open up that tank and see properly developed negatives! If I can do it…so can you!


